Today every business are constantly looking for ways to streamline customer interactions and boost engagement. Integrating AI-driven chatbots into your workflow can be a game-changer, offering 24/7 support, automating lead generation, and enhancing overall customer experience. If you’re using GoHighLevel for your marketing and CRM needs, you’re already on the right track. But what if you could supercharge your efforts with a powerful AI chatbot built in just 10 minutes?
This blog post will guide you through the seamless process of integrating GoHighLevel with ChatMaxima, an AI chatbot platform designed to make your customer interactions smarter and more efficient. Whether you’re a seasoned marketer or just getting started, this step-by-step tutorial will have you up and running in no time. Say goodbye to long development cycles and hello to a fully functional AI chatbot that works hand-in-hand with your GoHighLevel system. Ready to get started? Let’s dive in!
The Power of Integration
Integrating ChatMaxima with Go HighLevel can significantly enhance your workflow efficiency and customer management capabilities. The integration facilitates real-time data synchronization between the platforms, ensuring that your customer information is always up-to-date and easily accessible. Whether you are managing leads, automating follow-ups, or personalizing customer interactions, this integration provides a seamless solution to optimize your processes.
Step-by-Step Integration Guide
1. Logging into ChatMaxima
To begin, log in to your ChatMaxima account. Once logged in, navigate to Quick Access and select Add Integration. This is where you will initiate the integration process with Go HighLevel.
2. Setting Up the Integration
Name your integration and choose Go HighLevel as the platform to connect. Clicking Authenticate HighLevel will redirect you to the Go HighLevel login page. After entering your Go HighLevel credentials and selecting your preferred method for receiving the security code, you will be prompted to enter the code. Following this, select your sub-account and complete the authentication process. A confirmation message will indicate a successful integration.
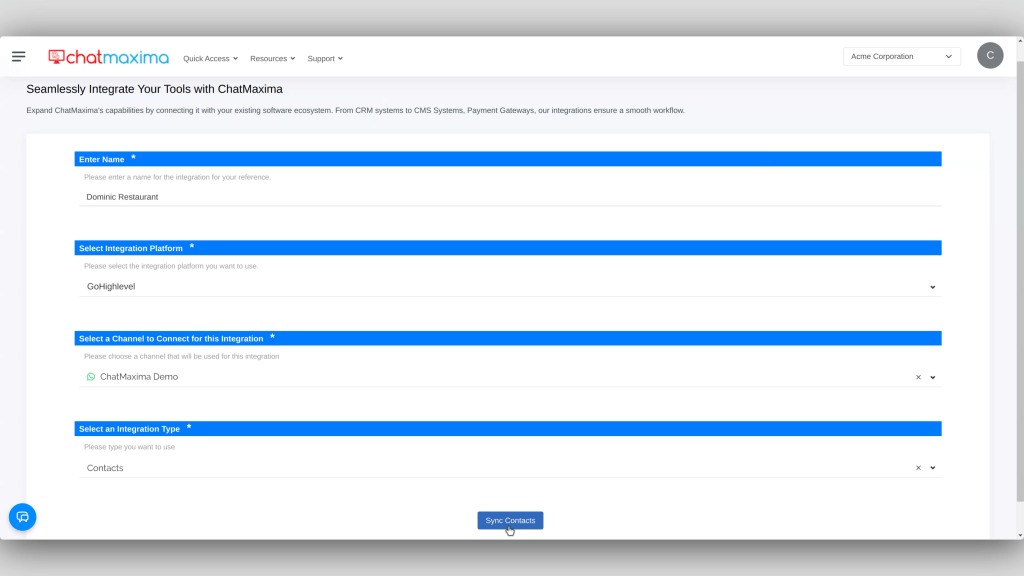
Next, select the channel and integration type, such as Contact, and click Sync Contact. This will display the number of contacts added and missing, along with a JSON file and webhook URL. You can now see Go HighLevel contacts in ChatMaxima.
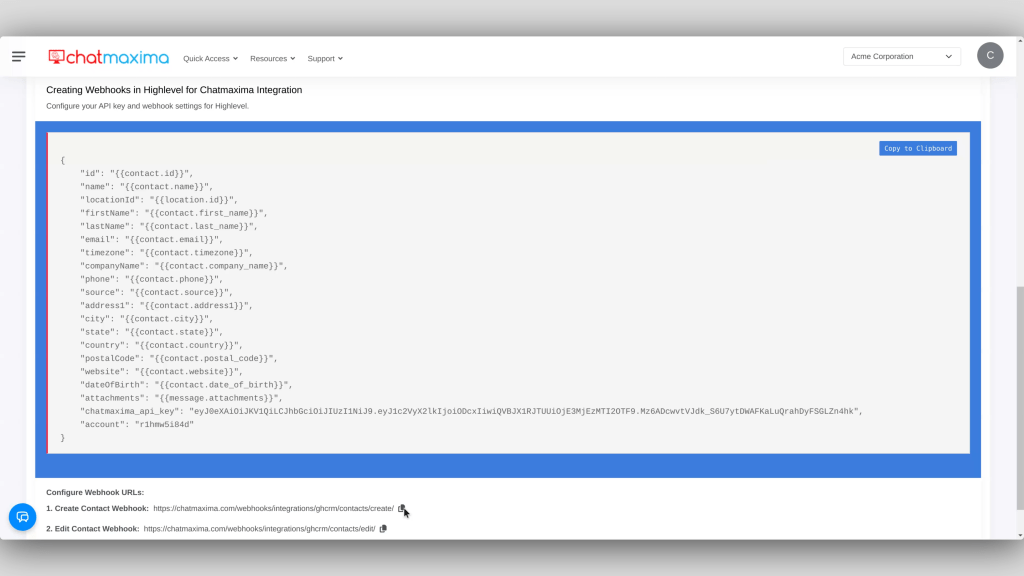
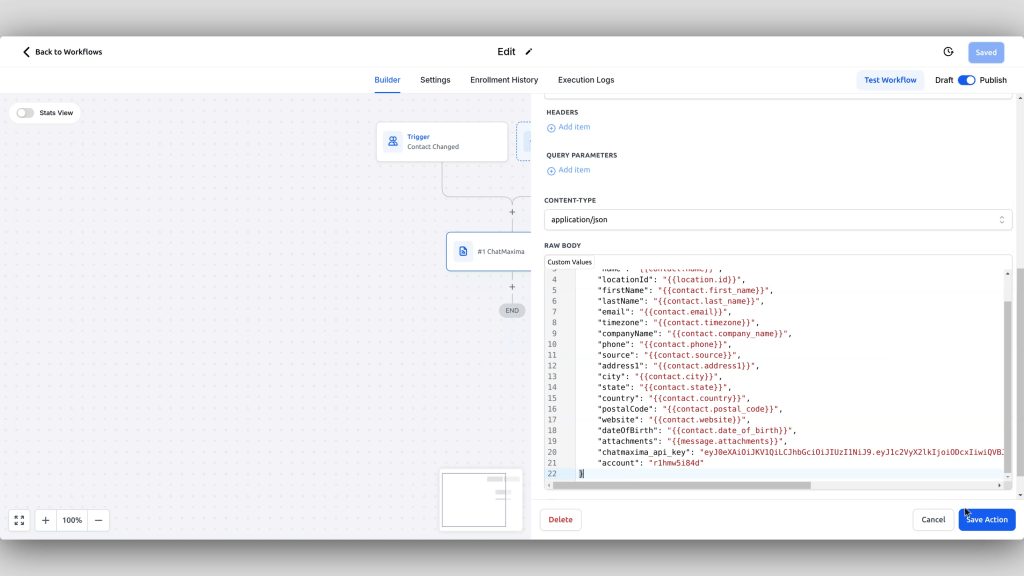
3. Creating Webhooks in Go HighLevel
To sync the contacts from both platforms, create webhooks in Go HighLevel. First, log in to Go HighLevel and switch to your sub-account. Navigate to the automation section and create a new workflow from scratch. Add a new trigger for contact creation, save it, and add a custom webhook. Enter an action name and the create URL provided by ChatMaxima. Copy the JSON from ChatMaxima and paste it into the RAW Body section and then save and publishing the workflow. Repeat this process for editing contacts by creating another workflow with a trigger for contact changes. Verify the contact syncing by checking that changes in Go HighLevel are reflected in ChatMaxima.
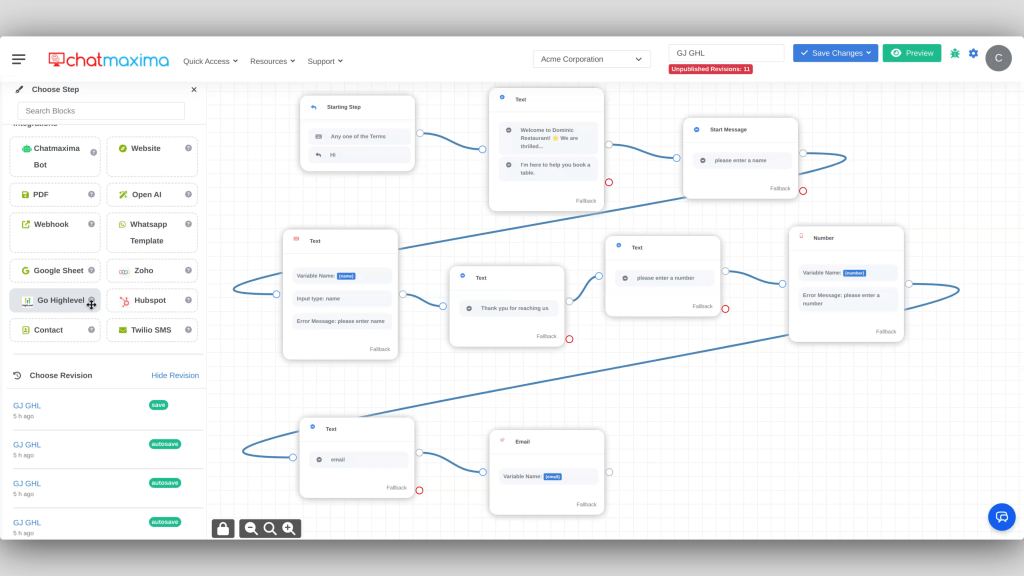
4. Creating your Chatbot for Lead Generation
Building a lead generation chatbot using ChatMaxima’s drag-and-drop visual builder is a quick and intuitive process. Start by logging into your ChatMaxima account and creating a new chatbot project. Design a welcoming message using the “Text” or “Message” block to greet visitors and set the stage for interaction. Next, gather essential visitor information by dragging “Input” blocks for details like name, email, and phone number, customizing each block with clear instructions. To qualify leads, incorporate “Quick Replies” or “Multiple Choice” blocks to ask targeted questions, and automate follow-ups using “Condition” blocks that trigger specific actions based on responses. Integrate the chatbot with your CRM, such as GoHighLevel, to ensure leads are automatically captured and managed, explained in detail in the next step. Add an end message to confirm receipt of information and offer next steps, like scheduling a call. Before deploying, thoroughly test the chatbot to ensure a seamless flow. Once deployed, monitor its performance using ChatMaxima’s analytics to gather insights and optimize for better lead conversion rates. With this approach, you can efficiently create a powerful AI chatbot that captures and qualifies leads in no time.
5. Integrating Go HighLevel with a Chatbot
To integrate the newly created chatbot with GoHighLevel and sync the lead information to the contacts database of your GoHighLevel account, select the Go HighLevel node, choose the appropriate credentials and channel, and opt to sync contacts. Next, map the partner variables to ChatMaxima variables. This variables can gather information such as the user’s name, email, address, country, website, date of birth, and more. The data collected through the ChatMaxima chatbot is stored in both ChatMaxima and Go HighLevel, ensuring seamless data management across platforms.
Conclusion
Through this detailed process, you can seamlessly integrate ChatMaxima with Go HighLevel, automate workflows, and enhance your customer management. This integration not only improves efficiency but also ensures that your customer data is always up-to-date and easily accessible. By leveraging the powerful features of both ChatMaxima and Go HighLevel, you can optimize your business processes and provide better service to your customers.