Your customers are on WhatsApp. Over 2 billion people use it every day, and they expect businesses to respond within minutes, not hours. But hiring developers to build a custom chatbot? That’s expensive, time-consuming, and often overkill for most businesses.
Here’s the good news: you don’t need to write a single line of code to build a powerful WhatsApp chatbot. With no-code platforms, anyone can create an automated assistant that handles inquiries, qualifies leads, and even processes orders, all before their morning coffee.
In this guide, you’ll learn how to build your first WhatsApp chatbot step by step. No technical background required.
What You’ll Learn
By the end of this tutorial, you’ll have a working WhatsApp chatbot that can:
- Greet customers automatically
- Answer frequently asked questions
- Collect lead information
- Route conversations to your team when needed
Time required: 10-15 minutes
Prerequisites
Before you start, make sure you have:
- A ChatMaxima account (free trial available at chatmaxima.com)
- A WhatsApp Business API number connected to ChatMaxima
- A clear idea of what you want your chatbot to do
Don’t have WhatsApp Business API access yet? ChatMaxima can help you get set up during onboarding.
Step 1: Access the Chatbot Builder
Log into your ChatMaxima dashboard and navigate to the Chatbots section in the left sidebar. Click Create New Chatbot to open the visual builder.
You’ll see a blank canvas with a starting node. This is where your chatbot’s conversation begins.
Pro Tip: Give your chatbot a clear name like “WhatsApp Lead Bot” or “Customer Support Bot” so your team can easily identify it later.
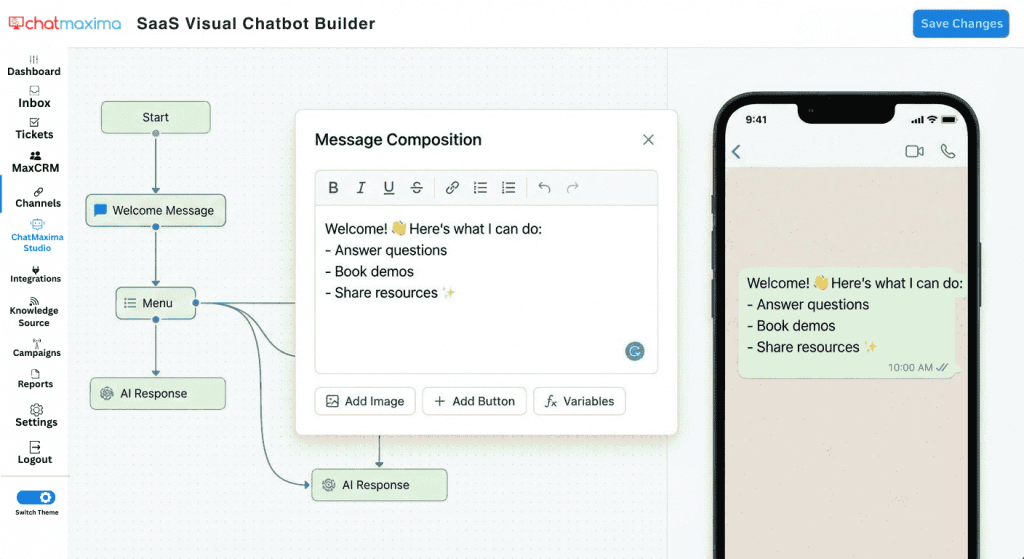
Step 2: Design Your Welcome Message
The welcome message is the first thing customers see when they message your WhatsApp number. Make it count.
Click on the starting node and select Send Message. In the message editor, type your welcome greeting. Keep it friendly and clear about what the bot can help with.
Example:
Hi there! 👋 Welcome to [Your Business Name].

I'm here to help you with:
- Product information
- Pricing and quotes
- Booking appointments
- Speaking with our team

What would you like help with today?
Step 3: Add Interactive Buttons
Instead of asking customers to type their response, use buttons to guide the conversation. This reduces friction and ensures the chatbot understands their intent.
Below your welcome message, add a Buttons element. Create options that match your most common customer needs:
- “Browse Products”
- “Get a Quote”
- “Book Appointment”
- “Talk to Human”
Each button will create a new branch in your chatbot flow.
Why buttons matter: WhatsApp users are 3x more likely to engage with buttons than open-ended questions. They’re faster to tap and eliminate typing errors.
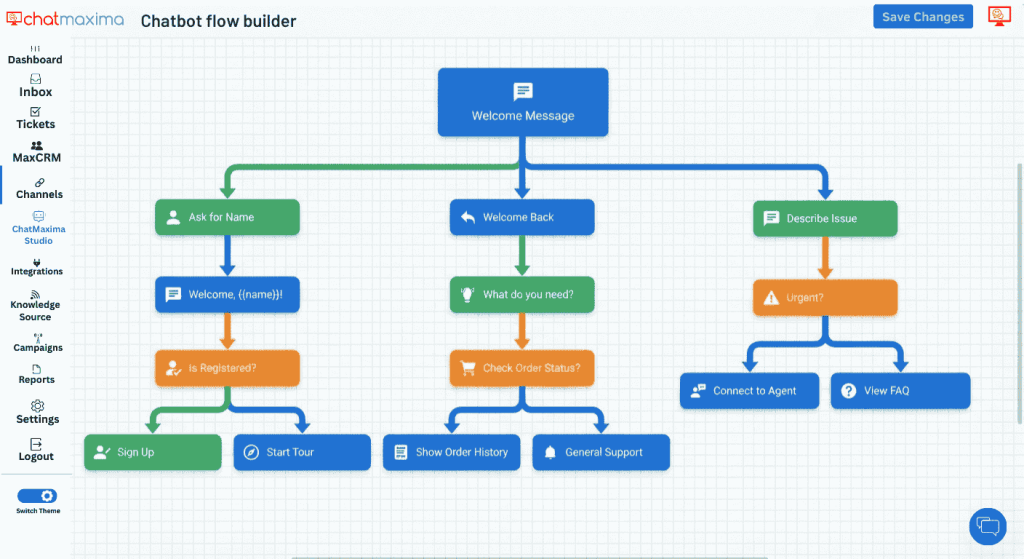
Step 4: Build Conversation Branches
Now comes the fun part: building out what happens when customers click each button.
Click on the first button (e.g., “Browse Products”). A new node appears. From here, you can:
- Send product information with images and descriptions
- Show a carousel of products
- Ask follow-up questions to narrow down their needs
- Collect their contact details for follow-up
Repeat this process for each button, creating a unique path for every customer intent.
For a simple chatbot, aim for 3-5 steps per branch. You can always add more complexity later.
Step 5: Collect Lead Information
When a customer shows buying intent (like requesting a quote), capture their details for follow-up.
Add a User Input node and configure fields like:
- Name
- Email address
- Phone number
- Company name (for B2B)
ChatMaxima automatically stores this information in your contact database. You can sync it to your CRM through native integrations with Salesforce, HubSpot, or Zoho.
Pro Tip: Don’t ask for too much information upfront. Start with name and phone number. You can collect additional details later in the conversation.
Step 6: Add Human Handoff
No chatbot should be an island. There will always be questions that need a human touch.
Create a “Talk to Human” path that:
- Asks the customer to briefly describe their issue
- Notifies your team via the ChatMaxima unified inbox
- Sends a confirmation message to the customer
Example confirmation:
Thanks! I've notified our team and someone will respond shortly.

Our typical response time is under 5 minutes during business hours (9 AM - 6 PM IST).
Step 7: Test Your Chatbot
Before going live, test every conversation path. ChatMaxima has a built-in preview mode that lets you simulate real conversations.
Click Preview in the top-right corner and walk through each button option. Check for:
- Grammar and spelling errors
- Logical flow (does each path make sense?)
- Dead ends (every path should have a clear next step)
- Correct data collection
Step 8: Connect to WhatsApp and Go Live
Your chatbot is ready. Now let’s connect it to your WhatsApp Business number.
- Go to Channels in your ChatMaxima dashboard
- Select your WhatsApp Business API number
- Under Chatbot Assignment, choose the bot you just created
- Set the trigger (e.g., “All new conversations” or “Specific keywords”)
- Click Save and Activate
Your chatbot is now live. Send a test message from a personal WhatsApp number to confirm everything works.
Pro Tips for Better Chatbots
Keep messages short. WhatsApp is a mobile-first platform. Long paragraphs are hard to read on small screens. Aim for 2-3 sentences per message.
Use rich media. Add images, videos, and PDFs to make your chatbot more engaging. A product image is worth a thousand words of description.
Set expectations. If your chatbot has limitations, be upfront about them. Customers appreciate honesty and knowing when they’ll reach a human.
Monitor and improve. Use ChatMaxima’s analytics to see where customers drop off. If everyone abandons the chatbot at the same step, that’s a sign something needs fixing.
Troubleshooting Common Issues
Chatbot not responding: Check that your WhatsApp number is connected and the chatbot is assigned as the active bot. Also verify your ChatMaxima subscription is active.
Messages showing as undelivered: This usually means the customer hasn’t opted in to receive messages or their phone number is invalid. WhatsApp requires explicit opt-in for business messaging.
Customers keep asking for humans: Your chatbot might not be answering their actual questions. Review your conversation analytics to identify common queries that aren’t being handled.
Buttons not appearing: Interactive buttons require WhatsApp Business API (not the regular WhatsApp Business App). Confirm you’re using the API version.
What’s Next
Congratulations, you’ve built your first WhatsApp chatbot! Here are ways to level up:
Add AI-powered responses: Enable ChatMaxima’s MaxIA feature to handle questions outside your predefined flows with intelligent, context-aware replies.
Connect your CRM: Sync leads automatically to Salesforce, HubSpot, or Zoho so your sales team can follow up without manual data entry.
Expand to other channels: The same chatbot can be deployed to Instagram, Facebook Messenger, and your website with just a few clicks.
Set up broadcasts: Use WhatsApp templates to send promotional messages, appointment reminders, and order updates to customers who’ve opted in.
Conclusion
Building a WhatsApp chatbot doesn’t require a development team or months of work. With ChatMaxima’s no-code builder, you can create an automated assistant in under 15 minutes that handles inquiries 24/7, qualifies leads, and frees your team to focus on high-value conversations.
The key is starting simple. Get your basic chatbot live, monitor how customers interact with it, and improve over time. Your first version won’t be perfect, and that’s okay. The businesses that win with WhatsApp automation are the ones who start today and iterate fast.
Ready to build your chatbot? Start your free ChatMaxima trial and follow this guide step by step.